Mobile device management (MDM) is a critical security measure that protects company data, like email, on mobile devices. It is a common requirement of compliance policies and regulators. Once enabled, it ensures that company data is encrypted and protected by an additional passcode, significantly increasing the security of your email on your device.
Important: If you have any other MDM certifications on your phone (for example, Intune) for managing email, you must uninstall them first. To check, go to Settings > General and scroll down to VPN & Device Management. Leaving conflicting profiles in place can prevent enrollment or block access to company email.
Video: Citrix Secure Hub install on Apple iPhone
Setting up Mobile Device Management on iOS takes a few steps and is divided into three sections. The video above covers Sections 1 and 2.
Note: If you are using MDM only for accessing an email app of your choice, complete Sections 1 and 2 only, then add your email to the mail app of your choice (Apple Mail or Outlook for iOS). If you are using MDM for any further reason, continue through Section 3 to install Citrix Secure Mail and Secure Web inside the Secure Hub.
Section 1: Install the Citrix Secure Hub
Step 1: Download the Citrix Secure Hub
Download the Citrix Secure Hub from the Apple App Store.

Step 2: Allow notifications
Open the Citrix Secure Hub app on your phone after it installs. When prompted, tap Allow for notifications.
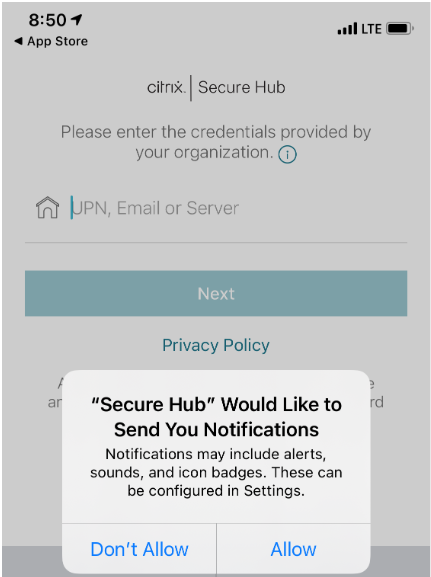
Step 3: Enter the server address
On the next screen, enter mdm.procirrus.com and tap Next.

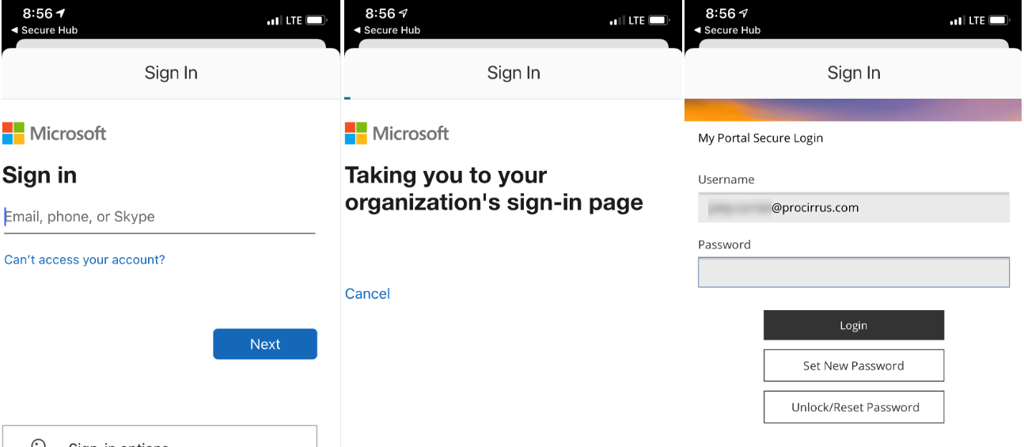
Step 4: Sign in with your email credentials
Enter your email credentials and tap Next.

Step 5: Confirm enrollment
A message will pop up asking if you want to enroll. Tap Yes, Enroll.

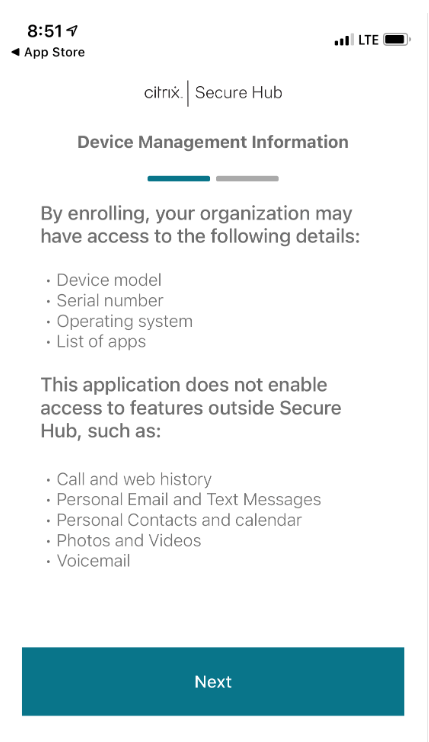
Step 6: Continue through Device Management Information
The next page will display Device Management Information. Tap Next on each of the two prompts.

Section 2: Install the XenMobile Profile
Step 1: Allow the configuration profile download
After the previous prompts, you will be asked to download a configuration profile. Tap Allow.

After the profile downloads, tap Close.

Step 2: Open the XenMobile Profile Service in Settings
Return to your home screen (swipe up from the bottom, or press the home button on older iPhones). On your phone, navigate to Settings > General, scroll down, and tap VPN & Device Management. Tap XenMobile Profile Service, then tap Install in the top right.

Step 3: Enter your iPhone passcode
After you tap Install, you will be prompted for your iPhone passcode. This is your Apple passcode (the one you use when installing apps), not your ProZone password.

Step 4: Install through the verification warning
A warning will appear stating that the service cannot be verified. This is normal and expected. Tap Install in the top right, then tap Install at the bottom of the prompt.


Step 5: Trust the profile
A second warning will appear. This is also normal. Tap Install in the top right again, then tap Trust.


Step 6: Finish the profile install
Tap Done. You can disregard the Not Verified message; it is expected.

Note: If you are using MDM only to access email, you are finished. You can now open the mail app of your choice and add your email account. Apple Mail and Microsoft Outlook for iOS both work. If you are using any other features and need to install Citrix Secure Mail inside the Secure Hub, continue to Section 3 below.
Section 3: Install Secure Hub apps for MDM Full
The Secure Hub offers several applications. At a minimum, you will want to install Secure Mail so you can access your company email.
Step 1: Create your Citrix PIN
Switch back to or launch the Secure Hub application. After loading for a few seconds, it will prompt you to create a Citrix PIN. This PIN will be used to sign in to the Secure Mail app. Enter your PIN, then enter it again to confirm.

Tip: You will be prompted to enter this PIN from time to time, so do not forget it. For most actions you can sign in using your phone's biometrics, such as fingerprint or facial recognition.
Step 2: Choose your location services preference
You may be prompted for your location services preference. This is your choice. If your phone is lost or stolen, location services help us locate it.

Step 3: Install Secure Mail and Secure Web
From the Secure Hub, select Secure Mail. Tap Install. You will be prompted to install both Secure Mail and Secure Web. Tap Install twice to install them both.

Step 4: Authorize Secure Mail
The installs may take a few minutes. You can return to your home screen and watch the icons appear as the apps install. Once they have finished, launch Secure Mail. You will be prompted to authorize the app. Tap Authorize.

Step 5: Sign in with your ProZone credentials
After tapping Authorize, you will be redirected to a Microsoft sign-in prompt. Sign in with your ProZone credentials.
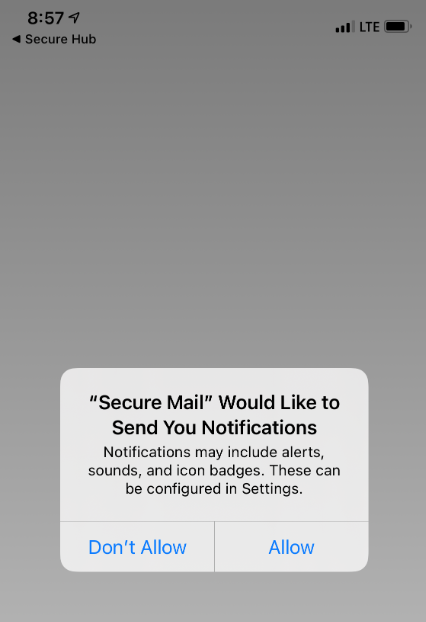
Step 6: Choose your notification preference
You will be asked whether you want Secure Mail to send notifications. This is your choice. Allowing notifications means you will be alerted when new email arrives. If you do not allow them, you will need to open the app periodically to check for new email.
Step 7: Finish setup
You are finished installing and setting up the apps. You can watch or skip the demo of the features.
Tip: If enrollment fails or you cannot reach the Secure Hub, contact ProCirrus Support for assistance.
Was this article helpful?
That’s Great!
Thank you for your feedback
Sorry! We couldn't be helpful
Thank you for your feedback
Feedback sent
We appreciate your effort and will try to fix the article